Introduction
You have a design ready. Your CAD file looks perfect on screen. You send it to a CNC machinist — and within hours, you get back a list of problems: undercut features that cannot be reached, tolerances that would triple the cost, wall sections so thin they would vibrate off the fixture. This is one of the most common and expensive mistakes in the product development process. The gap between a visually complete CAD model and a CNC-ready CAD file is wider than most designers expect. This checklist is built to close that gap. Whether you are a mechanical engineer, a product designer, or a startup founder sending a part out for machining for the first time, working through these steps before you submit your file will save you time, money, and frustration.
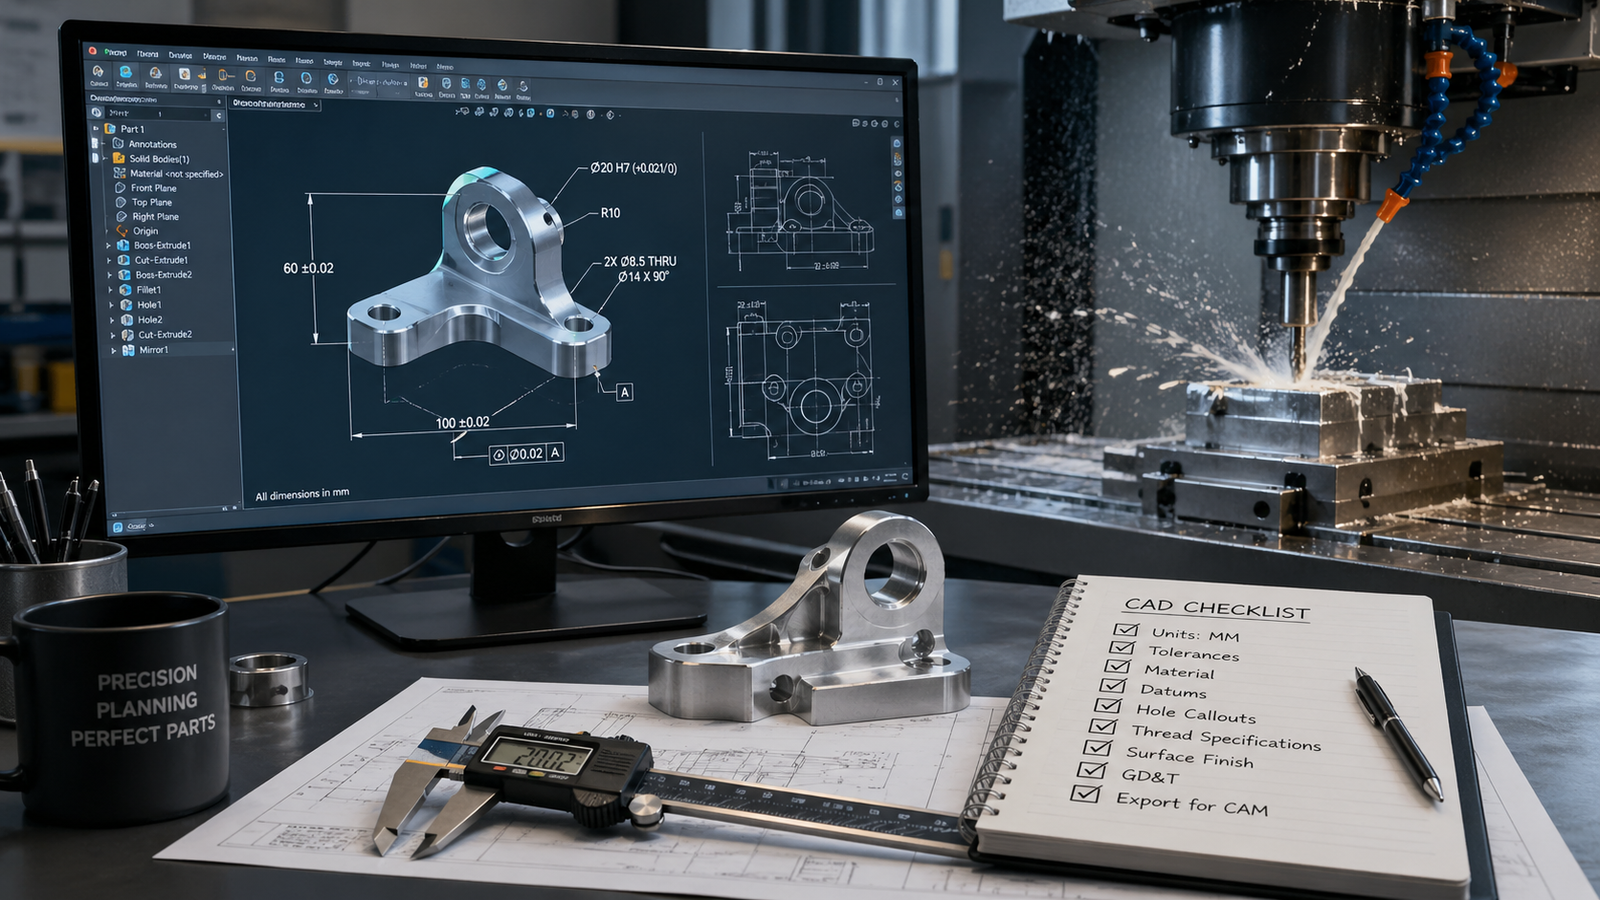
📋 What This Checklist Covers
- File format and geometry cleanup
- Wall thickness and feature size validation
- Tolerances and fit requirements
- Surface finish and material specification
- Thread, hole, and fastener standards
- Draft angles and undercut checks
- Assembly context and reference geometry
- Drawing package and documentation
Section 1: File Format — Send the Right File
The first thing a machinist needs is a file they can actually open and work with. Not all CAD formats are equal in a manufacturing context.
Checklist
☐ Export as STEP (.stp or .step) — This is the universal standard for CNC. It preserves solid geometry, tolerances (in STEP AP242), and works in virtually every CAM software. ☐ Include IGES as a backup if requested — Older shops may request IGES, though STEP is preferred for modern workflows. ☐ Do not send only an STL file for machining — STL is a mesh format intended for 3D printing. It lacks the precise parametric geometry required for CNC toolpath generation. ☐ Include native CAD if editable files are needed — SolidWorks (.sldprt), Fusion 360 (.f3d), or Parasolid (.x_t) for shops that will be modifying the geometry. ☐ Confirm units before exporting — Millimetres vs inches is one of the most common errors. Double-check your export settings before saving.
Tip: If you are using Fusion 360, always export STEP from File > Export, not from the browser. Browser exports can omit certain geometry states.
Section 2: Geometry Quality — Clean Models Only
CNC CAM software needs watertight, error-free solid geometry. Even small issues in your model can cause the CAM software to fail, generate incorrect toolpaths, or require expensive rework from the machinist.
Checklist
☐ Check for open bodies or shells — Your part must be a closed, watertight solid. Open surfaces will be rejected by most CAM tools. ☐ Remove duplicate or overlapping faces — Run a geometry check in your CAD software before exporting. In SolidWorks: Evaluate > Check. In Fusion 360: Inspect > Model Diagnostics. ☐ Eliminate zero-thickness walls — Any face with no material behind it will cause toolpath errors. ☐ Remove unnecessary internal geometry — Sketch geometry, construction planes, and reference bodies should be suppressed or deleted before export. ☐ Resolve all rebuild errors — If your CAD file has suppressed errors, resolve them before sending. A 'clean' model with hidden failures will not machine correctly. ☐ Confirm the part is a single, unified solid body — Assemblies should be broken into individual part files for quoting and machining.
Section 3: Wall Thickness and Feature Size
CNC tools have physical limits. They cannot cut features smaller than the smallest available tool, and thin walls will flex, vibrate, or break during machining. This is one of the most overlooked areas in DFM (Design for Manufacturability).
Checklist
☐ Minimum wall thickness: 0.8 mm for metals, 1.5 mm for plastics — These are safe starting points. Thinner walls are possible but require slow feeds, small tools, and add cost. ☐ Minimum feature width: 0.5 mm for end mills — Smaller features may require specialist tooling or EDM instead of standard CNC milling. ☐ Minimum hole diameter: 1 mm for drilling — Smaller holes can be drilled but increase cost significantly. Blind holes should have a standard depth-to-diameter ratio under 10:1. ☐ Check for tall, narrow ribs or fins — Anything taller than 3x its own width will vibrate under cutting loads. Add a draft or fillet to base of ribs. ☐ Verify internal corner radii — All internal corners in a milled part need a radius equal to at least half the tool diameter. Sharp internal corners are impossible to mill — the tool is round.
Feature & Minimum Recommended Value
Wall thickness (metal)- 0.8 mm
Wall thickness (plastic)-1.5 mm
Hole diameter (drilled)-1.0 mm
Internal corner radius-0.5 mm (tool-dependent)
Rib height-to-width ratio-Max 3:1
Blind hole depth-Max 10x diameter
Section 4: Tolerances — Only Specify What You Actually Need
Tolerances are the single biggest lever on CNC machining cost. Tighter tolerances mean slower feeds, more passes, more inspection, and higher prices. Many designers default to unnecessarily tight tolerances out of habit — this is expensive.
Checklist
☐ Use general tolerances for non-critical dimensions — A note like 'General tolerance: ±0.1 mm unless otherwise stated' covers most features efficiently. ☐ Specify tight tolerances only for fit-critical features — Shaft diameters, bearing seats, locating pins, and mating faces typically need ±0.01 to ±0.05 mm. Everything else usually does not. ☐ Use ISO fit codes for shaft/hole pairs — H7/h6, H7/p6, etc. These communicate clearly and are universally understood by machinists worldwide. ☐ Avoid calling out tolerances smaller than ±0.005 mm unless absolutely necessary — These require grinding or lapping, not standard CNC. They dramatically increase cost and lead time. ☐ Check GD&T callouts for completeness — Every GD&T callout needs a datum reference. Floating callouts with no datum are unmanufacturable.
Section 5: Threads, Holes, and Fastener Features
Threaded features are a common source of confusion between designers and machinists. If your thread specs are ambiguous, the machinist will ask — which delays your project.
Checklist
☐ Specify thread standard, size, pitch, and depth — Example: M8 x 1.25 — 6H, 18 mm deep. Never leave any of these values implied. ☐ Use standard thread sizes wherever possible — M3, M4, M5, M6, M8, M10 in metric. UNC/UNF 1/4-20, 3/8-16 in imperial. Custom pitches cost more and require special tooling. ☐ Mark tapped holes vs through-clearance holes — A tapped hole and a clearance hole look identical in a 3D model. Both need callouts on the drawing. ☐ Specify countersink and counterbore dimensions — Angle, diameter, and depth for countersinks. Diameter and depth for counterbores. ☐ Flag any thread inserts or helicoils — If you plan to use Helicoil inserts in soft materials (aluminium, plastic), the pre-drill diameter differs from a standard tapped hole.
Section 6: Draft Angles and Undercuts
CNC milling tools move in X, Y, and Z axes. Any feature that cannot be reached by a tool moving in a straight line is an undercut — and undercuts either require special tooling, extra setups, or are impossible altogether.
Checklist
☐ Identify all undercut features before sending the file — Rotate your model 360° and look for any geometry that would be hidden from a tool approaching from above or from the side. ☐ Add relief angles or undercut clearance if needed — If an undercut is functionally necessary, discuss it with your machinist upfront. T-slot cutters and lollipop end mills can reach some undercuts. ☐ Flag features that require more than 3-axis machining — Compound angles, deep undercuts, and complex organic surfaces may require 4-axis or 5-axis machining — this affects cost and supplier selection. ☐ Check for trapped cavities — Any internal enclosed space that cannot be reached by a cutting tool is impossible to machine. These features are only achievable with additive methods (casting, 3D printing, EDM).
Section 7: Material and Surface Finish
A CAD file has no material. You must specify material and finish requirements explicitly — in writing, every time.
Checklist
☐ Specify material by standard designation — Examples: Aluminium 6061-T6, Stainless Steel 304, Mild Steel EN3B, Nylon PA66, Delrin (POM-C). Brand names are fine; generic terms like 'aluminium' or 'steel' are not specific enough. ☐ Specify surface finish by Ra value — Ra 1.6 µm is a standard machined finish. Ra 0.8 µm requires grinding. Ra 3.2 µm is acceptable for non-functional surfaces. State which faces need which finish. ☐ Flag faces that require post-processing — Anodising, powder coating, heat treatment, hardening, or plating. These affect dimensional allowances (anodising adds 10–20 µm per surface). ☐ Note any hardness requirements — Specify Rockwell (HRC) or Brinell (HB) values if required. Some alloys may need heat treatment to achieve the specified hardness.
Section 8: Drawing Package and Documentation
A 3D CAD file alone is rarely sufficient for production machining. A proper drawing package removes ambiguity, reduces back-and-forth, and protects you if parts arrive wrong.
Checklist
☐ Create a 2D engineering drawing for every machined part — Include: orthographic views, section views for internal features, all critical dimensions, tolerance callouts, material, finish, and title block. ☐ Include a title block with revision number and date — Without a revision number, you have no traceability if parts need to be remade. ☐ Add notes for any special requirements — Heat treatment sequence, inspection requirements, packaging instructions, or NDA/confidentiality markings. ☐ Export drawing as PDF — Send both the STEP model and the PDF drawing together. The STEP is for CAM programming; the drawing is for inspection and communication. ☐ Include an assembly drawing if sending multiple parts — Show how parts relate to each other, what the fits are, and any subassembly sequence that matters.
The Complete Pre-Submission Checklist at a Glance
File Format- STEP or IGES, correct units, no STL for machining
Geometry Quality- Watertight solid, no errors, no open shells
Wall & Feature Size- Min 0.8 mm walls, internal radii, hole depths
Tolerances- General tolerance note, tight only where needed, GD&T datums
Threads & Holes- Standard sizes, full callout (size, pitch, depth)
Undercuts & Draft- No hidden undercuts, flag multi-axis features
Material & Finish- Full material designation, Ra values, post-processing
Drawing Package- 2D PDF drawing, revision number, title block
Final Thoughts
Preparing a CNC-ready CAD file is not complicated — but it does require attention to detail. Every item on this checklist represents a real category of error that causes quoting delays, machining failures, or parts that do not fit. The designers and engineers who get parts back right on the first pass are not luckier. They are more thorough. Working through this list before submission is a habit that pays for itself with every project. If you have a design that needs review before machining, or if you need CAD modeling support to get your geometry production-ready, the team at Solidus 3D Modeling works with manufacturers and product teams worldwide. We review every file before delivery and flag DFM issues before they become expensive problems.
Frequently Asked Questions
What file format is best for CNC machining? STEP (.stp) is the industry standard. It preserves solid geometry and is compatible with all major CAM software. Avoid submitting only an STL file for CNC work — it is intended for 3D printing, not machining.
What wall thickness is safe for CNC machined aluminium? A general minimum of 0.8 mm is workable for standard aluminium alloys like 6061-T6. Below this, walls may flex during cutting. For more consistent results, aim for 1.5 mm or more on non-critical sections.
Do I need a 2D drawing if I send a 3D CAD file? Yes, for production parts. A 2D drawing communicates tolerances, surface finish requirements, thread callouts, and inspection standards that cannot be embedded in a STEP file reliably. Always send both.
How tight should my tolerances be? Only as tight as your part actually requires. Most non-functional surfaces work fine at ±0.1 mm. Fit-critical features like bearing seats or shaft diameters may need ±0.01 to ±0.05 mm. Over-tolerancing a part can double or triple its cost without any functional benefit.
What is DFM and why does it matter for CNC? DFM stands for Design for Manufacturability. It is the practice of designing parts so that they can be produced efficiently and reliably. For CNC machining, DFM covers wall thickness, internal radii, feature accessibility, tolerance levels, and material selection. Parts designed with DFM in mind are cheaper to quote, faster to machine, and more likely to arrive correct on the first pass.
No replies yet
Start the discussion
Be the first to ask a follow-up question or add practical insight about this topic.