Whether you are an engineer validating a mechanical design, a product manager stress-testing a business idea, or a startup founder racing to a demo day, rapid prototyping is one of the most powerful tools in your arsenal. Yet the term gets used loosely — sometimes meaning a 3D-printed part, sometimes meaning a clickable Figma mockup, sometimes meaning a two-week sprint.
This guide cuts through the noise. You will learn exactly what rapid prototyping is, which method fits your situation, what it realistically costs, and how long each approach takes — so you can make a confident, well-informed decision.
What Is Rapid Prototyping?
Rapid prototyping is the process of quickly creating a working or visual model of a product — before committing to full-scale manufacturing or development — so that ideas can be tested, validated, and refined at low cost and low risk.
The word "rapid" is relative. Compared to traditional product development, where a design might go through months of tooling before a single test unit exists, rapid prototyping compresses that cycle to days or weeks. The goal is always the same: learn fast, fail cheap, iterate early.
Rapid prototyping sits at the intersection of design, engineering, and business strategy. It is used across hardware, software, medical devices, consumer products, automotive, aerospace, and architecture — essentially any field where a concept must be proven before resources are committed at scale.
Why Rapid Prototyping Matters in 2026
The cost of building the wrong product has never been higher. Development cycles are faster, competition is global, and investor patience is shorter. Rapid prototyping addresses all three pressures:
It reduces financial risk. Discovering a design flaw in a $500 prototype is fundamentally different from discovering it after a $200,000 injection mold has been cut.
It accelerates stakeholder alignment. A physical or interactive prototype communicates intent far more effectively than a slide deck. It converts abstract requirements into something stakeholders can see, hold, and react to.
It shortens the feedback loop with real users. User testing on a prototype — even a rough one — surfaces usability issues, unmet needs, and unexpected use cases that no design review will catch.
It supports regulatory and compliance workflows. In medical devices, aerospace, and automotive, early prototypes feed into verification and validation processes required by regulatory bodies. Getting prototypes in front of reviewers early compresses the overall approval timeline.
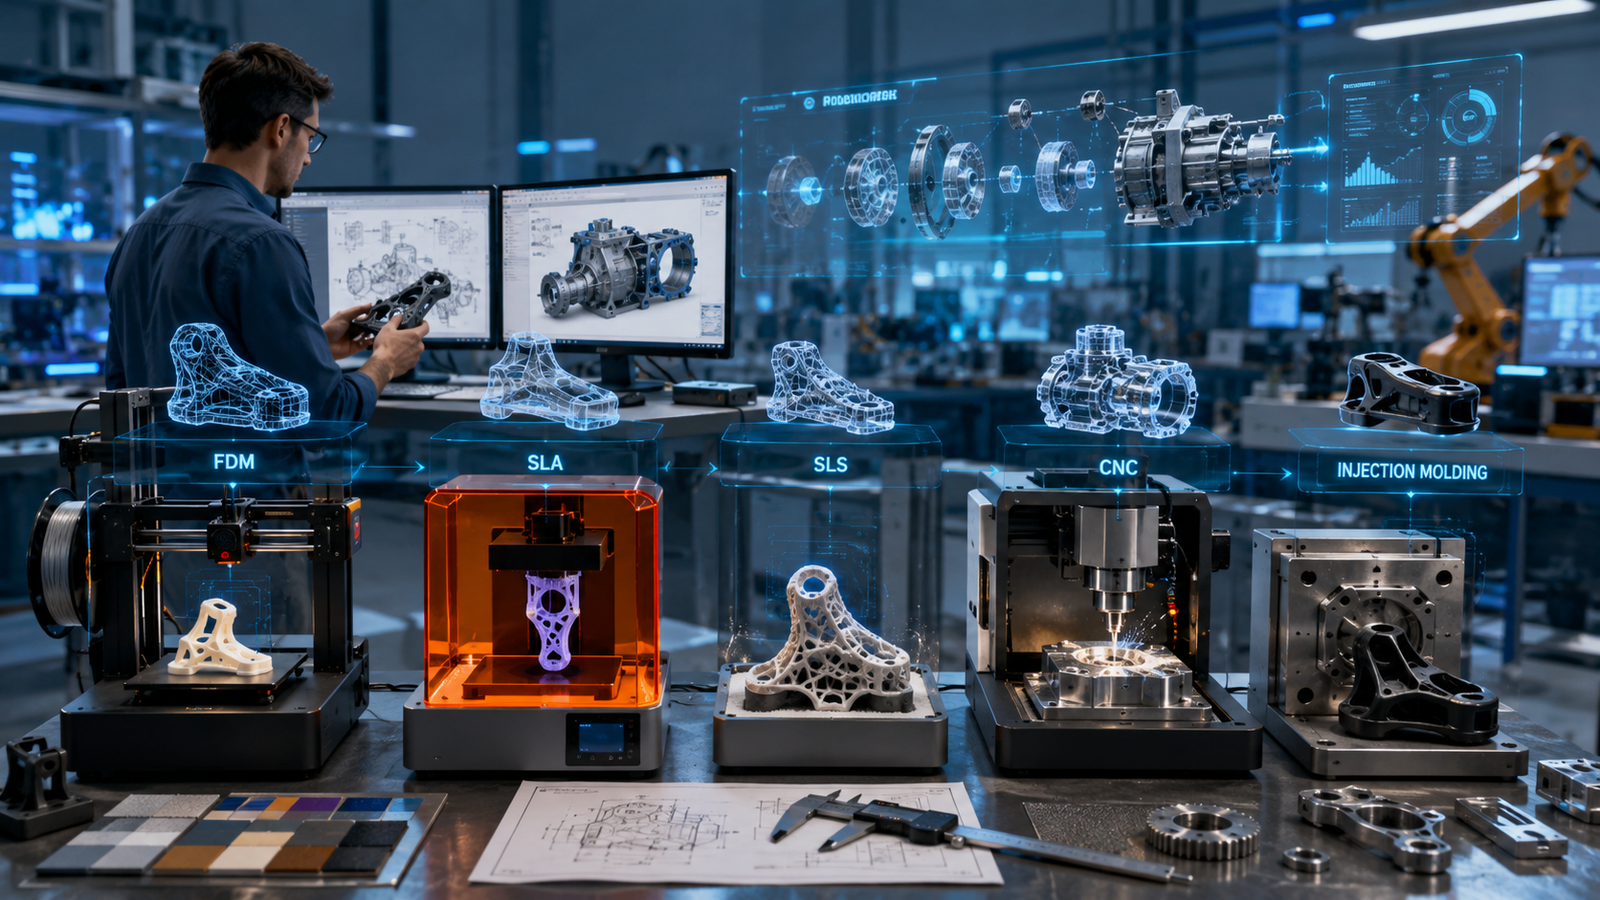
The 7 Main Rapid Prototyping Methods
Not all prototyping methods are created equal. The right choice depends on your material requirements, fidelity needs, volume, and budget. Here is a practical breakdown of each major approach.
1. Stereolithography (SLA)
SLA is one of the oldest and most precise additive manufacturing technologies. A UV laser cures liquid photopolymer resin layer by layer, building up a part with exceptional surface finish and fine feature resolution.
Best for: Concept models, visual prototypes, dental and medical models, jewelry, and any application requiring smooth surfaces and tight tolerances.
Typical layer resolution: 25 to 100 microns, producing parts that often require minimal post-processing.
Material options: Standard resins, tough resins, flexible resins, castable resins, and biocompatible resins for medical applications.
Lead time: In-house SLA printers can deliver parts within 24 to 48 hours. Service bureaus typically turn around parts in 3 to 7 business days.
Cost range: Simple SLA parts from a service bureau generally start around $30 to $150 for small components. Complex, large parts can run $300 to $1,000 or more. Desktop SLA printers (Formlabs Form 4, Elegoo Saturn) are widely available in the $500 to $4,000 range for teams that prototype frequently.
Key limitation: Standard SLA resins are brittle and degrade under prolonged UV exposure. They are excellent for form and fit validation, but rarely used for functional stress testing unless engineering resins are specified.
2. Fused Deposition Modeling (FDM)
FDM — also called FFF (Fused Filament Fabrication) — is the most widely adopted 3D printing technology in the world. A thermoplastic filament is melted and extruded through a nozzle, building the part layer by layer.
Best for: Functional prototypes, jigs and fixtures, structural testing, internal components, and budget-conscious iteration cycles.
Material options: PLA, ABS, PETG, TPU (flexible), Nylon, Polycarbonate, and carbon-fiber-filled composites. This versatility makes FDM uniquely suited to functional prototyping.
Lead time: An in-house FDM printer can produce most parts overnight. Service bureaus return standard parts in 2 to 5 business days.
Cost range: FDM is the most affordable prototyping method. Parts from service bureaus often start at $15 to $80 for small components. In-house printers (Bambu Lab X1C, Prusa MK4) range from $300 to $1,500 and pay for themselves quickly in organizations that prototype regularly.
Key limitation: Layer lines are visible on FDM parts, which affects surface finish and can create anisotropic (directional) weakness. Parts printed with poor orientation or inadequate infill settings may fail differently than injection-molded production parts.
3. Selective Laser Sintering (SLS)
SLS uses a high-powered laser to sinter powdered nylon (or other polymers) into solid parts, layer by layer. Because unfused powder supports the part during printing, SLS requires no support structures — enabling highly complex geometries.
Best for: Functional prototypes requiring durability, complex assemblies, interlocking parts, snap fits, living hinges, and production-like testing.
Lead time: 3 to 7 business days at most service bureaus. SLS machines are expensive ($50,000 to $500,000+), so in-house ownership is typically reserved for large enterprises or specialized product development firms.
Cost range: SLS parts start around $50 to $200 for small components, scaling significantly with volume and complexity. Desktop SLS options (Formlabs Fuse 1+) have brought entry-level access down to approximately $18,000 to $25,000 for the printer and post-processing station.
Key limitation: SLS parts have a characteristically grainy, matte surface texture from the sintered powder. They are excellent for function but require sanding, vapor smoothing, or painting if cosmetic finish matters.
4. Direct Metal Laser Sintering (DMLS) / Selective Laser Melting (SLM)
DMLS and SLM are metal additive manufacturing processes that use high-powered lasers to fuse metal powder into solid parts. They are the go-to methods when a prototype must behave exactly like the final metal component — not just look like it.
Materials available: Stainless steel, titanium, aluminum, Inconel, cobalt chrome, copper, and tool steel, among others.
Best for: Aerospace brackets, medical implants, heat exchangers, turbine components, complex fluid passages, and any application where metal performance characteristics are non-negotiable at the prototype stage.
Lead time: 5 to 15 business days, depending on part complexity, post-processing requirements (heat treatment, machining, HIP), and service bureau queue.
Cost range: Metal additive manufacturing is significantly more expensive than polymer methods. Simple small parts typically start at $200 to $600. Complex parts with extensive post-processing (support removal, HIP, CNC finishing, surface treatment) can reach $2,000 to $10,000 or more per part. For high-value aerospace and medical applications, this cost is easily justified against the alternative — expensive tooling or machined billet.
Key limitation: Residual stress and anisotropic properties in metal printed parts require careful process control and often mandatory heat treatment to achieve material properties comparable to wrought or cast equivalents. Surface roughness on as-printed metal parts is typically Ra 10 to 20 µm, requiring post-machining for sealing surfaces, threads, or bearing fits.
5. CNC Machining
CNC (Computer Numerical Control) machining is a subtractive process — material is removed from a solid billet using milling, turning, drilling, and grinding operations. It is one of the oldest precision manufacturing technologies, but in the context of rapid prototyping, modern 5-axis CNC centers can produce highly accurate parts in metals and engineering plastics within days.
Materials available: Virtually any machinable material — aluminum, steel, stainless steel, titanium, brass, copper, PEEK, Delrin, polycarbonate, and hundreds of others.
Best for: Prototypes requiring tight tolerances (±0.025 mm or better), excellent surface finish, functional hardware testing, bridge production before tooling, and any application where the prototype must behave identically to the production part.
Lead time: Simple parts can be quoted and shipped in 3 to 5 business days through online CNC services. Complex multi-setup parts typically take 7 to 15 business days.
Cost range: Simple aluminum brackets or housings start around $100 to $400. Complex parts with tight tolerances, multiple setups, and finishing operations can run $500 to $5,000 per part at prototype quantities. Online platforms (Protolabs, Xometry, Hubs) have driven prices down significantly through automated quoting and distributed manufacturing networks.
Key limitation: Geometric freedom is constrained by tool access. Internal cavities, undercuts, and certain organic shapes that additive manufacturing handles effortlessly are difficult or impossible to machine without creative fixturing or EDM. For highly complex geometries, additive may be the better choice even if the material is metal.
6. Injection Molding for Prototyping (Soft Tooling)
Traditional injection molding uses hardened steel tools that can cost $10,000 to $100,000 and take 8 to 20 weeks to manufacture. Prototype injection molding — also called soft tooling or bridge tooling — uses aluminum molds or 3D-printed inserts to produce 50 to 10,000 injection-molded parts in weeks at a fraction of the cost.
Best for: Late-stage prototypes where material properties and part behavior must match production exactly, pre-production validation, regulatory submissions requiring production-representative samples, and market test runs.
Lead time: Soft tooling typically takes 2 to 4 weeks for mold fabrication, followed by 1 to 2 weeks for sampling and first-article inspection. Total lead time of 3 to 6 weeks is typical.
Cost range: Soft aluminum tooling for a simple single-cavity mold starts around $3,000 to $8,000. A multi-cavity or more complex mold may run $8,000 to $25,000. Part costs at prototype volumes (50 to 500 parts) are typically $5 to $50 per part depending on complexity. This approach makes economic sense when you need production-representative parts in volume — not for early-stage concept validation.
Key limitation: Even aluminum tooling requires committed design intent. Changes to the design after a soft tool has been cut cost money and time, though modifications are far less expensive than recutting a steel production tool.
7. Digital / Software Prototyping
Not all prototypes are physical. For software products, apps, digital services, and connected hardware, digital prototyping is the fastest and cheapest way to test ideas with real users.
Low-fidelity prototypes — paper sketches, wireframes, or rough clickable screens in tools like Balsamiq or Whimsical — take hours to days to produce and are ideal for testing navigation flows and information architecture without any coding.
Mid-fidelity prototypes — interactive mockups in Figma, Sketch, or Adobe XD — typically take 1 to 5 days per core user flow and allow realistic usability testing, investor demos, and developer handoff.
High-fidelity / coded prototypes — functional builds in React, Flutter, or native code — take 1 to 4 weeks for a focused MVP and are appropriate when you need to test actual performance, API integration, or backend logic.
Cost range: Low to mid-fidelity digital prototypes can be produced internally at the cost of designer or PM time. High-fidelity coded prototypes from a freelancer or small agency typically run $3,000 to $30,000 depending on scope and complexity. No-code tools (Webflow, Bubble, Glide) have made functional digital prototypes accessible to non-developers, often for $0 to $200 in platform costs.
Choosing the Right Method: A Decision Framework
The right prototyping method depends on five factors: the stage of development you are in, whether your product is physical or digital, the fidelity required, your available budget, and your timeline.
Stage of development is the most important filter. In the earliest concept stage, speed and cost matter most — FDM, SLA, or low-fidelity digital prototyping are the right tools. As you move toward late-stage validation and pre-production, fidelity and production-representativeness become more important — pointing toward SLS, CNC machining, DMLS, or soft tooling for hardware, and coded prototypes for software.
Fidelity requirements vary by audience. A prototype shown to investors needs to look and feel compelling. A prototype used for engineering stress testing needs to behave like the real part. A prototype used for early user research just needs to be good enough to provoke a real reaction. Matching fidelity to purpose — rather than maximizing fidelity by default — is one of the most important skills in prototyping strategy.
Material requirements narrow the field quickly for hardware. If your part must be metal, your choices are DMLS/SLM, CNC machining, or casting. If polymer performance characteristics are required (e.g., PEEK for sterilization resistance, PC for optical clarity), CNC or SLS are typically the right approaches. If appearance is the only requirement, SLA or even high-quality FDM with post-processing will suffice.
Timeline often makes the decision. If you have 48 hours before a board meeting, FDM or SLA in-house is the answer. If you have three weeks before a clinical study, CNC machining or SLS from a service bureau is appropriate. If you have six weeks and need production-representative parts, soft tooling is the right investment.
Budget should be evaluated per insight, not per part. A $3,000 CNC prototype that saves you from cutting a $60,000 production tool is an extraordinary return. A $50 FDM print that allows you to test three different ergonomic shapes in a user study is equally valuable.
Rapid Prototyping Costs at a Glance
Since tables cannot always be displayed in blog environments, here is a clear breakdown of typical cost ranges per method, written for easy scanning.
FDM 3D Printing is the most affordable entry point, with service bureau parts typically running $15 to $150 for most prototypes. In-house printers cost $300 to $1,500. Total project cost for a concept prototype: $50 to $500.
SLA 3D Printing offers superior surface quality at a modest premium. Parts from service bureaus typically run $30 to $300. In-house printers (desktop to professional grade) cost $500 to $10,000. Total project cost for a visual prototype: $100 to $1,500.
SLS Nylon Printing is the workhorse of functional polymer prototyping. Parts start around $50 to $200 at service bureaus. In-house industrial SLS systems start around $50,000. Total project cost for a functional prototype set: $200 to $3,000.
CNC Machining covers the widest range depending on material and complexity. Simple parts start around $100 to $400. Complex multi-setup parts with tight tolerances run $500 to $5,000+. Total project cost for a functional metal prototype: $500 to $10,000.
DMLS / Metal 3D Printing is the highest-cost additive method, with simple parts starting around $200 to $600 and complex aerospace or medical components running $2,000 to $15,000. Total project cost for a metal functional prototype: $1,000 to $20,000.
Soft Tooling / Prototype Injection Molding requires a tooling investment of $3,000 to $25,000, with per-part costs at prototype volumes of $5 to $50. Total project cost including tooling and first article samples: $5,000 to $40,000.
Digital Prototyping (low to mid fidelity) can be nearly free using internal tools, or $500 to $5,000 with a freelance designer. High-fidelity coded prototypes or MVPs run $5,000 to $50,000+ depending on scope and technology stack.
Rapid Prototyping Timelines: What to Realistically Expect
Timelines vary significantly based on part complexity, post-processing requirements, shipping, and revision cycles. The estimates below reflect typical industry experience, not best-case scenarios.
Overnight to 48 hours: In-house FDM or SLA printing of a simple part with no post-processing. Ideal for iterating on ergonomics, fit checks, or early concept visualization before a same-week meeting.
3 to 5 business days: Service bureau FDM, SLA, or simple CNC machining with standard shipping. Suitable for first-look prototypes when in-house equipment is unavailable or part size exceeds in-house build volumes.
5 to 10 business days: SLS, DMLS, or more complex CNC parts with post-processing (surface finishing, anodizing, painting). Appropriate for functional testing, user studies, and investor demonstrations.
10 to 20 business days: Complex metal additive parts requiring heat treatment, HIP, or extensive post-machining. Multi-part assemblies with tolerance stack-up requirements. Medical and aerospace prototypes requiring first-article inspection documentation.
3 to 6 weeks: Soft tooling fabrication and first-article injection-molded samples. This timeline is necessary when production-representative material properties and cosmetics are required for regulatory submissions or market testing.
1 to 4 weeks (digital): From wireframes to clickable prototype (1 to 5 days), from clickable prototype to coded MVP (2 to 4 weeks). Digital timelines depend heavily on the scope of features included and the availability of design and development resources.
A commonly overlooked factor in prototyping timelines is the revision cycle. Most teams go through 2 to 4 rounds of iteration before reaching a prototype they are willing to show externally or move into production. Building at least one full revision cycle — and its associated lead time — into your project schedule from the beginning will prevent the schedule pressure that leads to poor decisions.
5 Common Rapid Prototyping Mistakes (And How to Avoid Them)
Over-engineering the first prototype. The first prototype's only job is to answer a question. Spending three weeks making it perfect before you have validated the core assumption is wasted motion. Start crude, iterate to precision.
Skipping the "what question am I answering?" step. Every prototype should be built to answer a specific question: Does this form factor fit comfortably in a user's hand? Does this mechanism survive 10,000 cycles? Does this checkout flow reduce cart abandonment? Prototypes built without a clear question tend to generate inconclusive feedback.
Choosing fidelity based on what looks impressive. A high-fidelity prototype shown to users who are evaluating core functionality can bias the feedback — users focus on aesthetic details rather than the underlying concept. Match fidelity to the specific question you are trying to answer.
Ignoring design-for-manufacturing constraints during prototyping. Designs that work beautifully in additive manufacturing often cannot be reproduced economically in injection molding or die casting. If your end production method is injection molding, involve a mold designer early enough to flag DFM issues before they become expensive surprises.
Treating the prototype as the destination rather than a milestone. Rapid prototyping is a process, not a deliverable. The value comes from what you learn and how you apply those learnings to the next iteration. Teams that treat the prototype as the goal often under-invest in the structured testing and feedback capture that makes prototyping valuable.
Rapid Prototyping vs. Traditional Development: The Business Case
Traditional product development follows a linear, gate-based process: requirements freeze → design → tooling → manufacturing → testing → launch. The first physical artifact appears very late in the process, meaning that design flaws discovered in testing require expensive, time-consuming corrections to tooling and manufacturing processes.
Rapid prototyping inverts this model. Physical or digital artifacts appear within days of ideation, enabling iterative learning throughout the development process rather than a single high-stakes validation event at the end.
The business case is straightforward. A study frequently cited in product development circles found that the cost to fix a defect roughly doubles with each phase of development it goes undetected. A problem caught in prototyping costs orders of magnitude less to fix than the same problem caught in production or — worst of all — in the market.
Beyond cost, there is a speed advantage. Teams that prototype rapidly learn faster, align faster, and ship faster. In markets where time-to-launch is a competitive differentiator, the ability to compress the development cycle is a genuine strategic asset.
How to Get Started With Rapid Prototyping
If you are new to rapid prototyping, the following steps will get you to a first prototype quickly, regardless of your industry or product type.
Define the question your prototype must answer. Write it down. "We need to validate that users can complete onboarding in under three minutes without reading instructions." Or: "We need to verify that this hinge mechanism survives 5,000 open/close cycles without failure." The clearer the question, the more useful the prototype.
Choose the minimum fidelity required to answer that question. Resist the urge to build more than necessary. A paper prototype or a 3D-printed shell might answer your question faster and cheaper than a fully functional unit.
Select a method and source. For physical prototypes, online service bureaus (Protolabs, Xometry, Hubs, JLCPCB for electronics) provide instant quoting and fast turnaround. For digital prototypes, Figma is the industry standard starting point.
Build, test, and capture structured feedback. Run your prototype through the scenario it was designed to test. Capture the findings in a structured way — not just "users liked it" but specific observations, failure modes, and improvement opportunities.
Decide: iterate, pivot, or proceed. Based on what you learned, determine whether the design needs another iteration, the concept needs a fundamental rethink, or the prototype has validated enough to move forward into the next development phase.
Rapid prototyping is not a single tool — it is a mindset. The teams that use it most effectively are those that treat every prototype as a learning event, every failure as signal, and every iteration as progress toward a product that genuinely works.
Frequently Asked Questions
What is the difference between a prototype and an MVP? A prototype is a model used to test a specific aspect of a product — it may or may not be functional. An MVP (Minimum Viable Product) is a real, functional product with the minimum set of features required to deliver value to early users and generate meaningful feedback. Prototypes precede MVPs; MVPs are intended for real users in the market.
How many prototypes does a product typically require before production? Most products go through 3 to 7 distinct prototype iterations before reaching production readiness. Simple products with well-understood requirements may converge in 2 to 3 iterations. Complex products — particularly those in regulated industries — may require 10 or more documented prototype generations.
Can rapid prototyping be used for large products? Yes, though large products often require modular prototyping strategies — prototyping individual subsystems or components rather than the full product at once. Some service bureaus offer large-format SLS, FDM, and CNC machining for components up to several meters in size.
Is rapid prototyping only for physical products? No. Rapid prototyping is equally central to software, digital product, and service design. Tools like Figma, Framer, Webflow, and no-code platforms have made digital prototyping faster and more accessible than ever.
How do I protect my intellectual property when using a service bureau? Most reputable service bureaus offer NDA agreements upon request and maintain secure, siloed manufacturing environments for sensitive projects. For early-stage IP, requesting an NDA before uploading files and reviewing the bureau's data retention policies are standard due diligence steps.
Final Thoughts
Rapid prototyping is not a technology — it is a philosophy. The specific methods, costs, and timelines covered in this guide are tools. The underlying principle is simple: the sooner you can put something real — physical or digital — in front of real people in real conditions, the faster you will learn what works and what does not.
In a product development landscape where the cost of being wrong is high and the cost of iterating early is low, rapid prototyping is not optional. It is the practice that separates teams who ship products people love from teams who ship products people tolerate.
Choose your method based on your question, not your budget. Build to learn, not to impress. And iterate until the answer is clear.
This article is original, copyright-free content written for educational purposes. All cost and timeline estimates reflect general industry ranges as of mid-2026 and may vary based on geography, vendor, material specifications, and part complexity.
No replies yet
Start the discussion
Be the first to ask a follow-up question or add practical insight about this topic.